Kele Blog

Cold-weather prep: Look beyond part number when replacing a control valve

Start with the application, not the part number

A valve tag is valuable, but it is only the beginning.

Before selecting a replacement, identify what the valve is controlling and how the system is intended to operate. Is it serving a heating coil or cooling coil? Is it a two-way or three-way application? Should the valve fail open or closed? Is the actuator two-position, modulating, floating, or pneumatic? What should happen if power or the control signal is lost?

Those questions are particularly important in older facilities, where what is installed may no longer match the original plans or sequence of operation.

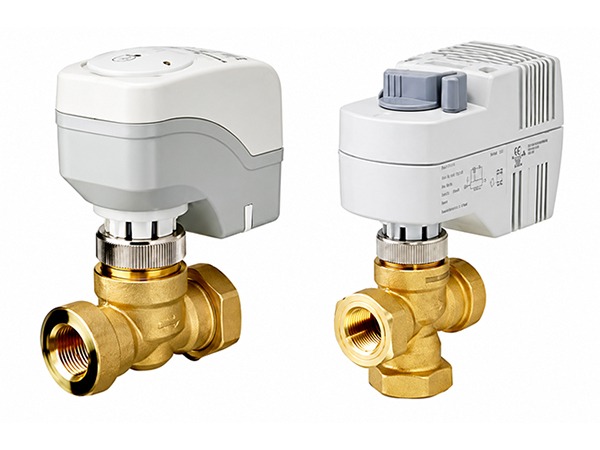
The Siemens 599 Series is a good example. A technician may recognize “599” on the valve and assume that is enough information to identify a replacement. In reality, the name covers several distinct control valve families.

599 family What it is Key distinction
599 Series zone valves Small two- and three-way globe valves 1/10-in. (2.5 mm) stroke
599 Series ball valves Quarter-turn control valves Rotary actuation
Flowrite™ VF 599 Series Globe valves for larger applications 3/4-in. (20 mm) stroke; electronic or pneumatic actuation

Same 599 name. Very different valves and actuator requirements.

That’s why identifying the complete assembly, rather than simply matching the most visible number, matters.

Make sure the actuator matches the job

Don’t overlook the problems that look like valve failures

A valve that isn’t controlling properly doesn’t automatically need to be replaced.

Before condemning the hardware, check the basics around it: control signal, wiring, power supply, actuator travel, linkage or mounting, and the BAS command. Verify that the actuator can actually drive the valve through its required range.

Manufacturer instructions can reveal less obvious issues, too. Siemens specifies correct polarity on its 24 Vac electronic actuators and cautions against powering certain actuators before they are attached to a valve. Some models perform a calibration stroke at startup, making proper assembly and commissioning part of correct operation.

These are small details with potentially expensive consequences. A new actuator installed on an existing wiring problem isn’t likely to solve the service call.

Don’t assume the old valve was sized correctly

Like-for-like replacement also carries another risk: repeating an old sizing problem. Control valves should be selected based on the application’s required flow and pressure conditions, not simply the pipe diameter. An oversized valve can make stable control difficult, even when the valve and actuator are functioning exactly as designed.

If a unit has always struggled to maintain temperature, hunts around setpoint, or seems to operate primarily near one end of the valve’s travel, replacement is an opportunity to verify the original selection rather than automatically reproduce it.

For the Siemens 599 line, published capacity graphs, Cv data, and close-off pressure information can be used to check the application. Siemens also publishes control-valve selection and sizing guidance for working through the calculations. A few extra minutes spent verifying the application can be more valuable than finding the replacement part number quickly.

When the wrong valve becomes a frozen coil

In a unit ventilator, fan coil, or similar application, valve selection can also be tied directly to freeze protection.

Consider a heating coil where a freezestat is intended to protect the equipment during low-temperature conditions. If a previous repair changed valve action, altered the wiring, or bypassed part of the original control sequence, the system may appear to operate normally until the conditions that require freeze protection actually occur.

Then the consequences can be much larger than a failed actuator: a frozen or ruptured coil, water damage, an occupied space without heat, and an emergency repair.

Before putting seasonal equipment back into service, confirm that the valve and actuator respond as the sequence requires and that freeze protection is actually capable of overriding normal control when needed.

That is especially worth checking on equipment with a history of unexplained winter failures or components that have clearly been replaced over the years.

Treat the fall walkthrough as an identification exercise

The best time to sort through an unfamiliar control valve isn’t during a November no-heat call.

During preseason maintenance, photograph the valve tag and actuator label together. Record the line size and whether the valve is two-way or three-way. Note the control signal and required action. If drawings or sequences are available, compare what is installed with what the system was designed to do.

For Siemens 599 Series valves, the documentation can then narrow the identification further. The different valve and actuator families have their own technical instructions covering dimensions, wiring, capacity, close-off pressure, installation, and compatible actuators.

And if the tag is unreadable or the combination doesn’t make sense, stop before ordering. A photo of the existing valve, actuator, piping, and labels can often reveal far more than a partial part number.

Know what you’re replacing before you replace it

Control valve replacement should be a straightforward maintenance task. The problems usually begin when “replace the valve” becomes shorthand for “order whatever looks like the one that’s there.”

Start with the application. Confirm the valve family, action, actuator, control signal, sizing, and sequence. Then use the manufacturer’s documentation to identify the component that satisfies those requirements.

For Siemens 599 Series applications, Kele provides the associated technical literature on its product pages, and Kele technical support can help with valve identification, sizing, actuator selection, and crossover questions when the existing installation doesn’t provide a clear answer.

Need help identifying a Siemens 599 Series valve or actuator? Photograph the valve tag, actuator label, and installation before you remove anything. Kele’s technical support team can help determine what you have and what the application requires.

Tridium security update for specific Niagara systems

Summary

Tridium has identified a software security issue affecting the Program Module in certain supported Niagara Framework and Niagara Enterprise Security versions. If your system is running Niagara 4.14u5 or 4.15u4, you should review the available update options and plan to apply the appropriate correction. Kele is sharing this notice so you can confirm your installed version and take action where needed.


Manufacturer Product or family Affected version
Tridium Niagara Framework 4.14u5
Tridium Niagara Enterprise Security 4.14u5
Tridium Niagara Framework 4.15u4
Tridium Niagara Enterprise Security 4.15u4


Why this matters to you

The issue affects software access controls within the Niagara Program Module. Updating affected systems helps reduce the risk of unauthorized changes or increased access within your Niagara environment.


Kele engineering recommendation

Kele Engineering’s current recommendation:

  1. Confirm the Niagara product and software version installed at your site.
  2. If you are running an affected version, review Tridium’s official technical bulletin.
  3. Apply the appropriate Tridium patch or upgrade to Niagara 4.14u6 or 4.15u5, based on your system requirements and support path.
  4. Review authorized user accounts, physical system access, remote-access protections, module signing, and Security Dashboard warnings.
  5. Contact Kele Technical Support before updating if you need help determining the correct update path.


What you should do

Please confirm your installed Niagara version and schedule the appropriate update if your system is running 4.14u5 or 4.15u4.

Tridium lists the following targeted patch files:

  • program-rt-4.14.5.22.1.jar
  • program-rt-4.15.4.24.1.jar

These jar files are available as a download from the Niagara Central Software Download Area as Program module patches for 4.14.5 and 4.15.4 to address CVE-2026-11804 programModulePaches.zip. Tridium also states that the correction is included in these newer releases:

  • Niagara Framework and Niagara Enterprise Security 4.14u6
  • Niagara Framework and Niagara Enterprise Security 4.15u5


Manufacturer information and links

For additional technical details beyond this email, review the Official Tridium Technical Bulletin.

Software updates are available through Niagara Central Software Downloads. (log-in required)

Tridium also recommends reviewing the Niagara 4 Hardening Guide for system-security best practices.


Contact Kele

For troubleshooting, product behavior, firmware, installation, or field issues, contact: B[email protected], or 833-800-3346. For licensing, pricing, quotations, availability, or orders, contact: [email protected] | 833-800-3345

Please have your Niagara product name, installed software version, and any available system details ready when you contact us.

The hidden scheduling problem in zone valve installation

Sponsored content by Schneider Electric


On a hydronic HVAC project, valve selection can affect more than flow. The way a valve is designed can also influence construction sequencing, trade coordination and even how components are protected before startup.

Zone valves are relatively small components in a building automation system but installing them can involve two very different stages of construction. Early in the project, plumbers and mechanical contractors are focused on piping rough-in. Valve bodies need to go in, connections need to be made and piping needs to be tested.

Controls work typically comes later, after wiring is pulled and technicians are ready to connect and commission the system. So why should the actuator have to go in at the same time as the valve body?

One valve, two very different jobs

Consider a sweat-connected zone valve. Installing the valve body can involve soldering, torch work, pipe preparation and all the dust and debris that come with an active construction site. None of that is particularly friendly to an electrical actuator.

Heat is an especially important consideration. Schneider Electric’s installation instructions for its VT/VS PopTop™ valves specifically caution against soldering with the actuator in place because heat can damage the unit.

“A removable actuator provides a simple alternative: don’t install it yet.”

With Schneider Electric’s VT Series PopTop™ design, the valve body can be installed during piping rough-in without the actuator attached. The mechanical contractor can complete the piping and check the system for leaks. Later, when controls wiring is ready, the actuator mounts directly onto the valve body without field-installed linkage or calibration.

That changes the workflow from one installation event into two independent tasks. The important part isn’t simply that the actuator comes off. It’s that the mechanical and controls portions of the installation no longer have to happen at the same time.

Key Takeaways

A removable actuator provides a simple alternative: don’t install it yet.
Separating the valve body from the actuator removes that scheduling dependency.
Delaying actuator installation reduces exposure to heat, dust, paint and job-site handling.
Mechanical and controls completion become two clear, separate checkpoints.
The VT Series PopTop™ actuator can later be removed and replaced without disturbing the valve body or piping.

Less trade coordination can mean fewer project headaches

On a large project, mechanical crews may be working well ahead of controls contractors. Wiring may be waiting on walls, ceilings, panels or other construction milestones. If the plumber needs the controls component to complete the valve installation, another dependency has been added to the schedule.

The plumber can finish the wet side when the piping is ready. The controls contractor can finish the electrical side when the controls system is ready. That doesn’t eliminate the need for coordination between trades, but it can eliminate one reason their schedules have to overlap. And the larger the project, the more meaningful that can become. A minor coordination issue at one terminal unit is exactly that: minor. Repeat it across dozens or hundreds of valves, however, and small inefficiencies can start adding up.

“Separating the valve body from the actuator removes that dependency.”
Schedule dependency, illustrated
A fixed actuator ties mechanical and controls trades to the same window. A removable actuator lets each trade work on its own timeline.
Rough-inWiringStartupCommission
Fixed actuator
Mechanical + controls must overlap
Removable actuator
Valve body installed
Actuator added, independently
no shared dependency

Keep controls components out of the rough-in environment

There is another advantage to waiting: the actuator doesn’t have to spend the rest of construction sitting on the valve. Once an actuator is installed, it may remain in place for weeks or months before the building is commissioned. During that time, other work continues around it. Delaying actuator installation can help reduce unnecessary exposure to:

  • soldering heat
  • construction dust and debris
  • paint and overspray
  • accidental impact
  • handling by other trades
  • moisture and general job-site activity

For sweat-connected VT Series valves, Schneider goes further than simply recommending caution: its installation instructions direct installers to remove the actuator before soldering. The valve body can also be leak tested before the actuator is attached. That makes staged installation a practical part of the intended installation process, not just a workaround.

A cleaner handoff from piping to controls

Separating the installation into stages can also make startup more orderly. The mechanical side can be installed and checked before controls work begins. Once the actuator is installed and wired, the controls technician can focus on actuator operation and the control sequence. Think of it as two checkpoints:

Mechanical completion

  • Valve body installed correctly
  • Piping connections complete
  • System checked for leaks
  • Valve ready for controls

Controls completion

  • Actuator installed
  • Wiring complete
  • Valve responds to the control command
  • Proper operation verified

This separation can also be useful when troubleshooting. If the piping and valve body have already been checked, technicians have a clearer starting point when diagnosing a controls issue.

The same idea pays off after construction

Construction sequencing may be the immediate benefit, but modular valve design can matter years later too. Actuators are electromechanical components. If one eventually needs replacement, there is little reason to disturb a properly functioning valve body and hydronic connection.

The VT Series PopTop™ actuator can be removed and replaced without removing the valve body from the piping. Schneider’s current documentation also notes that actuator replacement requires no tools.

“The VT Series PopTop™ actuator can be removed and replaced without removing the valve body from the piping.”

That allows a technician to address an actuator issue without unnecessarily turning it into a piping job. It is essentially the same principle that helped during construction: Keep the wet side and controls side independent when the work only involves one of them.

Look beyond the valve schedule

Valve selection still starts with the fundamentals: application, valve configuration, flow requirements, connection type, actuator voltage and control sequence. But those aren’t the only questions worth asking. When selecting a zone valve, consider how it will move through the entire project:

  • Can the mechanical contractor install and test the valve body independently?
  • Does the actuator need to be exposed during rough-in?
  • Can controls be added later without disturbing completed piping?

Where the Schneider Electric VT Series fits

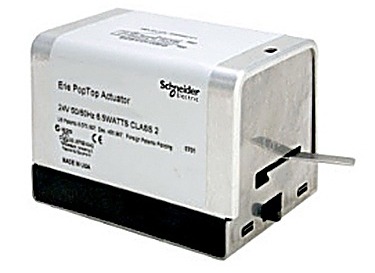
Schneider Electric VT Series PopTop™ zone valve, shown with actuator detached from valve body.

Schneider Electric's VT Series is a good example of designing around that larger installation lifecycle.

The PopTop™ design allows the valve body to go in when the mechanical system is ready and the actuator to go on when the controls system is ready. The actuator mounts directly to the valve body, and it can later be removed again for service without removing the valve itself.

It's a relatively simple design decision, but it solves a familiar job-site problem.

The plumber doesn't need to wait for controls. The controls contractor doesn't need to be there for piping rough-in. And the actuator doesn't need to spend construction sitting next to a torch before it ever receives power.

Sometimes making installation easier isn't about doing the work faster. It's about making sure two trades don't have to do their work at the same time.

Your schedule shouldn’t depend on distributor stock

Ten weeks into a 24-week data center build, a sensor component goes on allocation. The distributor’s next available ship date is 14 weeks out. The commissioning window is in eight weeks, and the SI did not know the constraint was coming because the part looked available when the project plan was set.

What Kele does differently: lock down material before the job needs it

Kele stocks long-lead and high-risk components ahead of your installation window and allocates them to your active project, so your schedule is backed by reserved project inventory before distributor stock or manufacturer lead times become a problem.

That starts with an early material conversation. We review the project BOM, identify parts that could hold up commissioning, and separate routine purchasing from parts that need an allocation plan. We check lead time behavior, substitution sensitivity, application requirements, and whether the part is likely to become constrained before the job reaches installation.

Then we hold stock for the job before the project needs the material. The important word is allocated. Allocated inventory is tied to your active project. It is not general shelf stock available to the next buyer who places an order.

No sourcing strategy eliminates every disruption. Manufacturers can change lead times, production can move, and demand can spike. But reserved project inventory helps prevent a common failure: discovering a constraint after the schedule has already committed to the part.

The best time to lock down material is right after the job is awarded, while procurement is still turning the BOM into a sourcing plan.

Allocation changes the risk profile

Available inventory and allocated inventory are not the same thing.

Available inventory Allocated inventory
Answers, “Can this ship now?” Answers, “Is this material held for this project when the project needs it?”
Can go to whichever order comes first. Tied to your active project.
Your release date moves if the manufacturer pushes the ship date out. Helps protect your installation and commissioning sequence.

Available inventory answers, “Can this ship now?” Allocated inventory answers, “Is this material held for this project when the project needs it?” That distinction can decide whether a data center team spends the final weeks before commissioning managing the build or chasing missing components.

For example, consider a 40 MW hyperscaler build that requires more than 200 pressure transducers across three phases. If each phase is sourced only when it is ready to release, every phase becomes another chance for stock or lead time to break the schedule. A component that was ordinary during phase one may become constrained by phase two. Procurement may still have a valid part number, an approved submittal, and a schedule that assumes delivery. The market can still take the part away.

Reserved material also reduces the need for rushed substitutions. A pressure transducer may look interchangeable until signal range, fitting, output, mounting, or environmental conditions are checked. We validate application fit before a last-minute substitute becomes the only remaining option, so a field fix does not become a commissioning problem.


Practical takeaway: make the sourcing conversation part of project award

Inventory buffering for data center construction works best before the market exposes the weakness in the plan. Once a component goes on allocation, your options narrow. Once commissioning is eight weeks away, even a good substitute may arrive too late to protect the schedule.

The practical move is to treat material allocation as part of project award. Identify long-lead and high-risk components, decide what needs to be allocated, and release material by phase instead of forcing the site to absorb everything at once.

Once the job is active, Kele reviews the project BOM, identifies controls components that could hold up commissioning, allocates material to the project, and releases it by phase. That lets procurement tell the project team what is covered, what is exposed, and what needs a decision before the field is waiting.


Your schedule should not depend on distributor stock. The conversation to have is at project award, before the supply chain decides your timeline. Call us at 877.826.9045

What arrives on the truck is the decision you already made

A project manager walks the floor of a new data center build two days before the commissioning window. The crew is on-site, but the work has not reached installation speed. Too much of the morning is going to unpacking, sorting, labeling, and assembling material that was supposed to be ready. The schedule needs installation progress because every slow handoff pushes the client’s go-live date closer to risk.

For project managers and system integrators where field assembly time that wasn’t in the estimate ends up in the schedule anyway.

The market gap: data center schedules are moving faster than field workflows

Data center construction is pushing more work toward prefab because speed, repeatability, and labor focus matter. Your schedule is built around compressed handoffs. Your field labor is expected to move quickly from access to installation to checkout.

Controls and instrumentation material often still moves through an older workflow. Components arrive by manufacturer, purchase order, pallet, box, or vendor. That may satisfy the order, but it does not match how your crew installs. Your team works by access, phase, drawing, panel, P&ID, and release sequence.

That mismatch creates hidden labor. The material is technically on-site, so the delivery looks like progress. The field still has to turn it into usable work before installation can begin.

The result is more than wasted time. It is lost installation velocity. Skilled labor spends the window preparing work instead of moving the project toward commissioning.

The gap is structural. Many sourcing relationships stop at availability. They can get parts to the site. They do not always convert your design intent, project standards, phase plan, and installation sequence into material that arrives ready for the next task.

That is why “what exactly arrives on the truck?” is a schedule question.

What Kele does differently

Kele helps move repeatable controls and instrumentation prep upstream through custom control panels, prefab assemblies, job-specific kitting, tagging, testing, and staged delivery.

We start with how the work needs to happen in the field. We look at your design intent, BOM, project standards, installation phase, and handoff requirements. Then we help turn those inputs into work packages that arrive closer to install-ready.

That changes the labor equation. We build, configure, prepare, tag, and group material before it ships, so your field team is not making those decisions under schedule pressure. The work that can be controlled before the truck leaves should not wait for the installation window.

No sourcing strategy eliminates every disruption. Site access, upstream work, and drawing revisions can still change the plan. But prefab, kitting, and staged delivery reduce the avoidable prep work that should not consume skilled labor during the window you need for installation.

The goal is practical: help integrators move faster, win more work, and bring their clients online sooner than a competitor still assembling on the floor.

We build, configure, prepare, tag, and group material before it ships, so your field team is not making those decisions under schedule pressure. The work that can be controlled before the truck leaves should not wait for the installation window. The work that can be controlled before the truck leaves should not wait for the installation window.

Prefab keeps skilled labor on the work that moves the project

Some work belongs in the field because it depends on site conditions. Repeatable panel and assembly work often belongs before the jobsite bottleneck.

Kele engineers custom panels to your design intent and project specs. We check that components match the system they will serve at install and commissioning. We build, configure, test, and inspect panels in Kele’s Memphis facility before delivery, including UL-508A inspection where required.

That shop step matters because it changes what your crew inherits. Your team still mounts, connects, verifies, coordinates, and commissions. They are not spending the same field window building the panel from parts or solving avoidable configuration issues on the floor.

For example, consider a 20MW colo build with 40 custom control panels tied to a phased installation sequence. If Kele builds all 40 to spec, tests them before delivery, and stages them by sequence, your field team can install complete panels as the work is released.

Prefab does not remove project risk. It moves repeatable work to a place where it can be controlled earlier. The fewer unresolved build decisions that reach the site, the more time your crew has for the work that actually advances the milestone.

Prefab vs. field-built panels: What changes for your crew
Field-built workflow Kele prefab workflow
Parts arrive loose and unverified for the system. Panels arrive built, configured, tested, and inspected to project specs.
Field labor spends the installation window assembling and routing. The crew spends the field window mounting, connecting, verifying, coordinating, and commissioning.
Small build decisions can vary across crews and phases. Repeatable builds hold to the same documented standard.
Configuration or assembly issues may be discovered on-site. Testing before delivery reduces avoidable issues reaching the site.
Field time is consumed by repeatable preparation work. More of the field window can be used for installation progress.

Kitting turns a BOM into field sequence

A BOM is not an installation plan.

On a data center project, your crew does not install by purchase order. It installs by access, trade coordination, phase release, and work sequence. A complete shipment can still slow the job if the field has to rebuild it into that sequence.

Kele’s job-specific kitting connects material to the way the work will happen. We organize components by phase, panel, work package, or installation sequence. We label and group material so your crew can start with the task in front of them.

This is where kitting supports speed. The work of matching material to the next release does not disappear when it is left out of the plan. Once it moves to the field, it competes with installation.

For example, consider a hyperscaler phase that compresses after upstream delays. If repeatable instrument assemblies arrive preassembled, tagged to the P&ID, and grouped for that installation window, the crew can move into the available scope without first building a staging system from loose material.

With Kele kitting the delivery to your sequence, that is the difference between a shipment that fills the floor and one that lets your crew start installing the hour it lands.


Repeatable builds help integrators scale standards

System integrators do not only need one clean installation. You often need the same standard to hold across phases, work packages, and concurrent builds.

That is difficult when every field crew is making small assembly decisions under different site conditions. One crew may route or label differently, while another makes a practical adjustment because one component arrived late. Each choice may seem minor, but together they create re-learning time for installers, commissioning technicians, and operators.

Kele’s repeatable build process turns approved designs into consistent assemblies. We build to the same documented standard across the project, so the next panel or assembly does not require your crew to rediscover what the last one required.

That matters when several builds are moving at once. If three data center projects share a standard panel design or assembly approach, variation becomes a schedule risk. The install team sees fewer one-off differences. Commissioning sees more familiar point organization. Your project team has fewer small exceptions to coordinate.

Repeatability is how integrators take on more concurrent builds without multiplying risk: the same Kele-built standard drops into each site, so scaling the program does not mean re-solving the same problem at every location.

Staged delivery protects recovery schedules

Timing can create as much friction as packaging.

A data center site may not have room for every component at once. Early delivery can crowd the floor, increase handling, and force your team to protect material that cannot be installed yet. Late delivery creates the opposite problem. Crews are available, the next scope is ready, and the material is still somewhere else.

The useful delivery is the one that matches the phase.

Kele supports staged delivery by organizing panels, kits, and prefab assemblies around the project sequence before they ship. We can align material to the phases or work packages opening next, so your team has less to store, reshuffle, or re-identify before installation.

This matters most after upstream delays. Recovery schedules depend on crews moving cleanly through the next available scope. If the shipment arrives as mixed material, the crew loses time before the recovery work starts. If it arrives staged for the phase, the available window has a better chance of turning into real progress.

A full order only helps when the field can use it. Staging the truck to your recovery sequence is exactly the kind of thing Kele plans before the load leaves the dock.

KEY TAKEAWAYS

Skilled field labor

Your field labor moves the project faster when repeatable prep work happens before material reaches the site.

Install-ready delivery

A delivery can meet the purchase order and still slow installation if it arrives unbuilt, unlabeled, or out of sequence.

Prefab panels and assemblies

Prefab panels and assemblies help integrators keep pace with data center schedules that expect faster handoffs.

Job-specific kitting

Kitting by phase, sequence, or work package turns a BOM into work the field can use.

Repeatable build standards

Repeatable builds reduce small site-to-site differences that slow installers and commissioning teams.

Talk to us before the next BOM goes out for bid. Call 877.826.9045

Why your sourcing strategy is already behind schedule

For system integrators managing pre-specified data center builds where a sourcing delay isn’t just a procurement problem; it’s a schedule crisis.

Your installation window opens in six weeks. The components are specified and locked. The owner expects the schedule to hold. The controls package is approved. The field team is preparing for installation.

The manufacturers and distributors say the material should be available.

You’ve managed enough projects to know that “should be available” and “will be available when installation starts” are not the same thing. If a specified component becomes constrained, the conversation does not happen between the supplier and the General Contractor or Owner. It happens between you and the GC. The submittal cycle resets. The schedule shifts. Your commissioning date becomes the topic of discussion.

The market gap

Most sourcing models are designed around inventory availability, not project schedules.

Traditional distributors wait for demand to arrive. Inventory decisions are based on general market consumption. If material is available when a purchase order is submitted, the process works. If demand increases or lead times change, the project team absorbs the consequences.

Buying directly from a manufacturer or working with a single-vendor supplier introduces a different limitation. Each can provide deep expertise and support for its own products, but visibility stops at that product line. Data center projects rarely depend on one manufacturer. They depend on multiple specified components arriving together to support a single installation schedule. That is where project-level coordination becomes just as important as product availability.

For a system integrator managing a pre-specified data center build, neither model addresses the actual risk.

Why traditional sourcing models fall short

Sourcing model Focus The gap
Traditional distributors Inventory availability based on general market demand The project absorbs the consequences when demand shifts or lead times change.
Manufacturer / single-vendor suppliers Deep expertise and support for their own product line Visibility stops at the product line. Data center projects require multiple specified components arriving together on one schedule.
Kele Sourcing aligned to your project schedule Components allocated to your BOM and installation phases, positioned before they are needed

Finding a part is rarely the issue. The real pressure comes from protecting a commissioning date while maintaining specification compliance. A sourcing decision that creates a new approval cycle can have more impact on the schedule than the original lead-time problem.

Most sourcing models become reactive because they begin at the point of purchase. By the time a supply issue appears, the schedule has already lost its easiest recovery options. What could have been solved months earlier becomes a conversation about delays, approvals, and revised installation dates.

The sourcing gap persists because availability is treated as a purchasing checkpoint instead of a schedule input, which means sourcing decisions made at purchasing are already too late to protect your commissioning window.

What Kele does differently

Kele approaches controlled sourcing for data center projects from a different starting point. Instead of waiting for demand to appear, we align with your project at the beginning. We learn the BOM, review the specification, understand installation phases, and map sourcing requirements to the project schedule before material is needed.

We source, stock, and position the specified components against your active project pipeline rather than against general market demand. Components are allocated against your BOM and planned installation phases so sourcing activity reflects project demand rather than broader market consumption. Components are released according to your installation timeline. When an installation phase opens, the material intended for that phase is already positioned to support it. Not only does Kele coordinate the sourcing across multiple vendors, but we also coordinate technical support across all the vendors, so it is a one stop shop for support, vendor management, and technical resources.

Building the material position before demand exists

The sourcing model matters most when supply conditions change. Lead times rarely become a problem overnight. Constraints typically develop over months as manufacturer availability shifts, demand increases, or specific components become harder to obtain. The challenge is recognizing those risks before they reach the project schedule.

That requires more than checking inventory. We review the BOM against known lead-time conditions, monitor manufacturer availability for specified components, and identify items that could become future constraints. When a component presents elevated schedule risk, inventory can be positioned before the market pressure reaches your project.

You see constraints during planning instead of during procurement. Corrective action remains available while schedule options still exist. When constraints are identified early and inventory is positioned before demand spikes, you retain options, protect the schedule, and avoid difficult conversations about shifting commissioning dates.

Protecting specification compliance without slowing the project

Material availability addresses only one part of the risk. Projects still have to satisfy specification requirements, approval processes, and installation schedules. Data center projects are heavily specified environments. Approved vendor lists, owner requirements, and design intent leave little room for improvisation. A component that arrives quickly but fails specification review creates a different kind of delay.

That is why specification understanding must happen before sourcing decisions are made. Kele reviews project requirements and BOM details upfront so sourcing activity remains aligned with design intent. We validate what is specified and position inventory accordingly. The goal is straightforward: the material arriving on-site should match the requirements approved at the start of the project. Supply constraints can still occur. No sourcing strategy eliminates every market disruption.

When those situations arise, we identify and evaluate approved alternatives before they become urgent. We review application requirements, protocol compatibility, signal characteristics, mounting considerations, and project requirements so potential options are already understood before they are needed. A substitution becomes a controlled exception rather than a reactive scramble. Approval cycles become shorter because the groundwork has already been completed. Most importantly, the decision remains in your hands rather than being forced by supply conditions.

How schedule-aligned delivery changes execution in the field

Delivery timing matters just as much. Many projects receive material according to distributor inventory cycles, arriving when stock becomes available rather than when installation activities require them. That often creates additional handling, temporary storage requirements, and unnecessary coordination work.

For phased data center construction, material is released to match each installation phase rather than warehouse availability. Installation teams receive what they need when they need it, avoiding unnecessary staging of material for future phases and keeping work aligned to the construction sequence.

Capability in practice

Practical Takeaway

Commissioning dates are often protected months before material arrives on-site. The decisions made during project planning determine how much flexibility remains when supply conditions change later.

Once lead-time problems become visible, your options narrow quickly. Specification requirements become harder to maintain, approval cycles become harder to avoid, and schedule recovery becomes harder to achieve.

You define the specification. You define the schedule. We align sourcing, inventory positioning, allocation, and delivery to support both.

Before your next project award, reach out to Kele to review the BOM, specification requirements, and installation schedule. That conversation establishes the sourcing strategy, identifies potential constraints, and determines whether material should be positioned against the project before procurement begins.

Schedule-alignment conversation before project award. Call us at 877.826.9045

Chart recorder replacement: The cutout matches but that doesn’t make it a drop-in

Sponsored by Honeywell

If you have a Honeywell DR4500A Classic in a panel and you are considering a DRC901C as its replacement, here is the first thing worth knowing: the two recorders use the same nominal 12.7-inch-square panel cutout. The DR4500A Classic specifies 322mm. The DRC901C specifies 322.56mm. Both sit about 4.2 inches behind the panel.

That nominal match can eliminate the expensive, disruptive part of a recorder swap: cutting and patching sheet metal on an existing panel. The new unit is also lighter, 10.8 pounds against 13.2.

If the DR4500A Classic is being used only to record 4-20 mA transmitter signals, the DRC901C may be a relatively straightforward mechanical replacement once the input wiring, shunts, charts, and configuration method are addressed. You also pick up several things on the way: Bluetooth configuration through Honeywell’s EasySet app, an optional 4-inch capacitive touchscreen, field calibration that stores both factory and field values so you can switch between them, a 200 millisecond sample rate, and 100 mA of transmitter power instead of 50.

The rest of this article is about the installations where it is not that simple. There are four of them, and the matching cutout is exactly what makes them easy to miss.


1. Your recorder is also a controller

This is the one that catches people.

The DR4500A Classic was never only a recorder. Depending on the model, it carried one or two integral PID loops with Accutune II, fuzzy logic overshoot suppression, and setpoint ramp and soak programming deep enough to store 18 ramp and 18 soak segments across six profiles. Output options included SPST relay, current proportional, position proportional for slidewire-driven valves, and duplex variations for heat/cool.

The current DRC901C offering is a recorder. Honeywell’s published model selection guide includes no integral control-output option.

If your DR4500A Classic is closing a loop on a valve, a damper, or a heating element, a DRC901C alone will not replace that control function. Check your model number and terminal strip before you order anything. Where control is in play, you are looking at a recorder plus a separate controller, or a small controller platform that handles both.

2. Your enclosure or area classification

The DR4500A Classic case and door were built to NEMA 3, with an optional UL and FM approved NEMA 4X door and front-panel protection to IP65. Depending on the model, it carried FM approval for Class I, Division 2, Groups A, B, C, and D.

The DRC901C front panel is designed to IP54. Its current listed certifications include CE, CSA, and UL 61010-1, with FCC and Bluetooth SIG certifications for the radio. The current published offering is not FM approved or listed for Class I, Division 2 service.

IP54 is dust-protected and splash-resistant. It is not a washdown rating. If your recorder lives in a dairy or food plant that gets hosed down, or in a classified area, the DRC901C is not a like-for-like replacement. That is not a specification detail to work around in the field.

3. You are recording thermocouples to a tight tolerance

On linear inputs, the two recorders are close. Both publish reference accuracy of 0.1 percent of full scale on 4-20 mA. If you are trending pressure or flow off a transmitter, compare the rest of the loop and the process tolerance, but the recorder’s published reference-accuracy figure does not change.

Thermocouples are a different conversation. Reference accuracy on a Type J input is published at plus or minus 0.4 degrees F on the DR4500A Classic and plus or minus 2 degrees F on the DRC901C. For Type K, the DR4500A Classic publishes plus or minus 0.6 degrees F from 0 degrees F to 2500 degrees F and plus or minus 1.25 degrees F below 0 degrees F. The DRC901C publishes plus or minus 4.5 degrees F for its standard Type K range. That is a real gap. Honeywell also states that DRC901C thermocouple total accuracy includes its published reference accuracy plus cold-junction compensation accuracy of plus or minus 0.5 degrees C.

For a lot of monitoring work, such as an oven, a chamber, or general process temperature, the DRC901C may still be comfortably inside the required tolerance. For heat treat, pasteurization hold verification, or anything where you are defending a number to an auditor, run the complete measurement uncertainty against your process tolerance before you commit. If the margin is thin, the answer may be a transmitter ahead of the recorder rather than a direct thermocouple input.

4. You need a hard alarm contact

The DR4500A Classic offered six configurable alarms tied to as many as two SPST relays, which could be used to drive a horn, a beacon, or a PLC input.

On the DRC901C, alarms are configurable on process variable or deviation with hysteresis, and they appear on the touchscreen display or in the EasySet app. Honeywell’s current model guide and wiring documentation include no alarm-relay output. If something downstream is wired to that contact today, it needs a new home.


Three things to account for beyond the recorder

External shunt resistors for mA inputs

External shunt resistors for mA inputs.
The DR4500A Classic presented 250 ohms of input impedance on 4-20 mA, so the loop wired directly to the recorder. The DRC901C specifies an external 10 ohm resistor with a tolerance of plus or minus 0.1 percent for each active mA input. Honeywell’s published accuracy figure explicitly includes the tolerance of that external resistor. Confirm whether the resistors are supplied with your recorder. If not, order one per active mA channel and specify the tolerance, because a 1 percent resistor will consume more of the measurement’s error allowance.

New charts

New charts, and all of them.
The DR4500A Classic used a 12-inch chart with a calibrated width of 4.62 inches. The DRC901C uses a 10.24-inch chart with a calibrated width of 4 inches. Your current DR4500A Classic chart inventory will not fit. The catalog is smaller too: the DR4500A Classic drew on a library of more than 5,000 preprinted charts, while the DRC901C line lists more than 200. If you are running a nonstandard range or an unusual rotation, confirm the chart exists and is available before you confirm the recorder. New units include one box of 0-100 Even starter charts, with 24 hours on one side and seven days on the other.

Phone, tablet, or display option

A phone, a tablet, or the display option.
Honeywell states this plainly in its model selection guide: a non-display unit can be operated only through the EasySet mobile app over Bluetooth, and there are no dip switches like there were on the DR4300. The app is also required for firmware upgrades on both display and non-display units. EasySet is currently available for Android and iOS devices.

If your plant restricts phones on the production floor, or your maintenance team has no approved mobile devices, specify the touchscreen. You will still need access to a compatible mobile device when it is time to update the firmware.


The part nobody puts on the datasheet cover

Buried in the model selection guide notes is one of the most useful things about this recorder.

Analog inputs arrive on a four-channel AI card. A two-pen model can plot any two of those input channels at a time, and a one-pen model can plot any one. Honeywell’s model guide states that all four inputs transmit over Modbus.

That means a two-pen DRC901C can draw two variables on paper while making all four input channels available over Modbus RTU. If you need a paper record for inspection while also feeding a historian, SCADA system, or PLC over RS-485, that capability is worth a closer look.

One caveat if you are correlating variables across pens: only pen 1, the purple one, references the chart timeline. Pen 2 does not. For most recording, that is irrelevant. If you are reading two traces against each other to the minute, know it going in.


On chart resolution

The calibrated width dropping from 4.62 inches to 4 inches is not, by itself, a change in the recorder’s input accuracy.

It is a readability change. You have about 13 percent less calibrated paper width across the same span, which means a given deviation produces a slightly smaller movement on the chart. If your operators are eyeballing the chart on the wall to catch drift, or if an inspector reads a value directly from the paper, it is worth seeing a printed sample before you standardize on it.

Kele’s process instrumentation team supports recorders, transmitters, controllers, and the sensors feeding them, alongside our building automation line. Send us the model number from your DR4500A Classic nameplate, and we will help determine whether the DRC901C fits the application and identify the recorder configuration, chart, external shunts, and any separate controller the replacement requires.

Your relay’s manual override is a bypass nobody is watching

Sponsored by Schneider Electric

A controls engineer once brought a shop-floor argument to PLCtalk. His company used Magnecraft plug-in relays for interposing PLC outputs and controlling small single-phase motors. The full-feature relays included a momentary test button and a small lock-down lever that could hold the contacts in the operated position.

Everyone agreed that the feature was useful for troubleshooting. That was also the concern.

When the lever is locked, the contacts can remain operated without coil power. The physical state of the load can therefore disagree with the controller’s command. If the panel has no independent feedback, the automation system may have no way to recognize that disagreement.

One person in the discussion raised a second concern. Because compatible plug-in relays can share a socket, a technician could replace a plain relay with a lockable version without realizing what had changed. The proposed solution was to remove lockable relays from inventory entirely.

That thread began in 2013, but the design question is still relevant: how do you keep a useful service feature from becoming an invisible operating state?

KEY POINT


A manual-override feature is useful for service, but when it can keep a load on without coil power, it can create a blind spot unless the system returns proof of state to the controller.


Return proof of state to the controller

The most useful suggestion in the PLCtalk thread was to wire a spare normally open contact to a controller input. That is good practice, with one important clarification.

The returned contact is proof of relay state, not proof of manual override.

Compare the feedback input with the controller’s command. If the output command is off but the feedback contact is on, the controller can alarm, log the event, or inhibit an automatic sequence where appropriate. The mismatch could be caused by a locked manual operator, a stuck or welded contact, or a wiring problem. The feedback helps expose all of those conditions.

It also has a limitation. If the controller is commanding the relay on while the manual operator is locked, command and feedback agree. A spare contact alone cannot identify that the manual operator is engaged. If the application requires explicit indication of manual mode, use a device or selector arrangement with a dedicated, monitored status contact.

The legacy Magnecraft 781R is SPDT, so it does not provide a spare second pole when its Form C contact is already serving the load. The legacy 782 Power Series offered DPDT versions, but it is not a drop-in upgrade. The 781R uses a five-pin 70-781D5R-1A socket, while the DPDT 782 uses an eight-pin 70-782D8-1 socket. Retrofitting means changing the socket and rewiring — and since the 782 is legacy as well, you would be spending that effort to land on another end-of-life part.

For a new design, select a current DPDT relay and matching socket whose coil, contact ratings, approvals, and manual-operator behavior fit the application. For an existing SPDT installation, another suitable feedback method may be required.


Two details worth handling at installation

Use the specified hold-down clip where vibration can loosen a plug-in relay. In an August 2025 PLCtalk thread, a technician reported finding three ice-cube relays in the bottom of a pump-down control panel after they had worked out of their sockets. The first recommendation was the metal clip designed to hook into the socket and pass over the relay.

If you are working with the legacy 781R, look for the 16-781SC metal spring clip or the 16-781IDC plastic identification and hold-down clip, both specified for the 70-781D5R-1A socket. Because the relay family is discontinued, there’s only a limited quantity available as new stock. Kele has availability at the time of writing/publication, and if you’re reading this after we’ve run out can help you source a current-generation alternative.

Mark and verify the coil voltage. The 24 Vac and 24 Vdc full-feature 781R relays are visually similar and fit the same socket. Their part numbers, 781XAXRM4L-24A and 781XAXRM4L-24D, differ by a single character. Installing the wrong coil can prevent pickup or overheat and damage the coil, depending on the mismatch. Marking the coil voltage on the relay and socket, then checking it against the drawing before energizing, reduces that risk.

Use only relay-and-socket combinations covered by the manufacturer’s approvals. Schneider’s 781R data states that the relay is UL listed when used with the proper Magnecraft socket. A socket that happens to accept the pins is not, by itself, evidence that the combination carries the same approval or performance.

Read the rating table by approval system

The 781R is commonly described as a 15 A relay, but that headline number does not replace the application-specific ratings in the data sheet.

Under the published IEC AC-1 rating at 250 Vac, the normally open contact is rated 15 A and the normally closed contact is rated 7.5 A. The IEC DC-1 table shows the same NO/NC distinction at 28 Vdc. Schneider’s UL resistive table, however, lists 15 A for both NO and NC contacts at 120 Vac, 277 Vac, and 28 Vdc.

That means the 7.5 A NC figure is real, but it should not be presented as a universal derating. Select the rating that applies to the load type, voltage, approval regime, and operating conditions of the actual installation. Motor, pilot-duty, inductive, and other loads have their own limits.


What the full-feature design got right

The 781R full-feature cover combined several useful service aids: a mechanical flag, a bipolar coil-status LED, a momentary manual pushbutton that operates without coil power, and a removable door that can hold the contacts in the operated position. That package made troubleshooting faster and gave designers a way to retain momentary testing while preventing lock-down where maintained operation was not wanted.

The feature itself is not a substitute for safe system design, and removing it is not a complete safety strategy. The better approach is to define which manual states are permitted, return proof of state where practical, alarm command/state disagreements, label the coil and replacement part clearly, and secure the relay in applications subject to vibration.


Check the lifecycle status before you specify it

Schneider Electric discontinued the 781R full-feature models in March 2026 and ended service that June, so treat anything you find in a catalog as legacy or final stock. Before you commit to a 781R, confirm with your supplier what is on the shelf and how long it will be supported.

Treat the 781R as service stock for existing installations, not as your default choice for a new design. Schneider points to the Harmony RPM family as the successor for several 781R configurations — but before you drop one in, verify the coil voltage, contact arrangement and ratings, socket, dimensions, approvals, indicator, and test-button behavior against what your panel needs.

If you are not sure which way to go, bring the application to Kele’s technical team — they can confirm what service stock is still available or help you spec a current Schneider relay, matching socket, and retention accessory for a new panel or retrofit.

Rethinking Panel Manufacturing in an Era of Skilled Labor Shortages

Estimated read time: 4 minutes

Skilled labor constraints are changing the way contractors get work done.

As technical talent becomes more constrained, contractors are taking a fresh look at how panels are built—and where their most experienced people create the most value.

Many contractors have spent years developing the people, processes and standards behind the panels they deliver. For those with internal panel capabilities, that investment can be a genuine source of pride and a meaningful competitive advantage. For others, outside partners have always played a role. And many contractors use a combination of both approaches depending on the project.

None of those models is inherently right or wrong. But the operating environment around them is changing.

Experienced engineers, technicians and skilled craft professionals remain difficult to recruit and replace. At the same time, project schedules are compressing, backlogs can shift quickly and customers still expect quality work delivered on time. The challenge is not a lack of capability. It is that skilled people are being asked to cover more work, across more projects, with less room for disruption.

That reality is prompting a more strategic question: As your business evolves, should your approach to panel manufacturing evolve with it?

Skilled labor is changing the economics of the work

Labor productivity has always mattered in construction, but constrained talent raises the stakes. FMI’s research found that 63% of respondents cited a lack of qualified craft labor as a top factor negatively affecting productivity. In the same study, 82% said a lack of skilled labor needed for field execution was driving demand for prefabrication.

The implication is not that experienced people should be removed from panel work. Their expertise is often essential to design, review, programming, testing and complex builds. The opportunity is to be more deliberate about which activities truly require that experience—and which repeatable production tasks can be completed through a different process or with additional support.

When senior technical resources are stretched, the hidden cost is rarely limited to the hours recorded against a panel build. It can also appear as delayed submittals, slower estimates, postponed commissioning, additional procurement effort or fewer people available to solve problems in the field. Those tradeoffs can be difficult to see because they often sit across different budgets, teams and projects.

$30–40B
Estimated lost profits from labor inefficiencies
FMI, 2024 Labor Productivity Study — Part 2: Prefabrication
Where expertise creates the most value

Experience-intensive work

  • Engineering and design review
  • Programming and commissioning
  • Field problem-solving
  • Customer and project support

Work that can be standardized

  • Panel assembly
  • Repeatable wiring
  • Documented testing
  • Production and packaging

Prefabrication is growing—but there is no single operating model

Contractors are responding in different ways. Some are investing further in their internal manufacturing capabilities. Some are adding outside support for overflow, repeatable builds or selected projects. Others are using strategic partners more consistently to simplify sourcing, improve predictability or expand the range of work they can take on.

FMI’s 2024 prefabrication study found that respondents currently spend 16% of craft labor hours in prefabrication and expect that share to rise to 34% within five years. The same research reported that 78% saw schedule savings and 66% found cost savings from prefabrication.

Craft labor hours in prefabrication
16%today→34%in five years

Those findings point to a broader industry shift, but they do not prescribe one answer for every contractor. Running an internal panel operation requires steady demand, the right people, disciplined processes and enough throughput to support the investment. Partner-supported work introduces its own questions around engineering alignment, communication, quality, sourcing and accountability. A blended approach can offer flexibility, but only when responsibilities and standards are clear.

Three approaches can all make sense

01

Build internally with your resources

A strong fit when skilled labor and expertise are readily available, and close collaboration or internal control are critical to project success.

02

Add manufacturing support

Useful when workloads fluctuate, schedules compress, sourcing becomes difficult or selected work would benefit from additional production resources.

03

Blend both approaches seamlessly

Match the delivery model to the project—keeping specialized work close while using trusted partners for repeatable builds, overflow or defined scopes.

Rethinking does not mean starting over

Taking a fresh look at panel manufacturing does not require redesigning an entire operating model. It can begin with one upcoming project, one repeatable panel family, one period of peak demand or one sourcing challenge.

The purpose is to make intentional choices. Keep the work close when that creates the best outcome. Add support where it strengthens the project. Adjust the mix as labor availability, workload and customer needs change.

Skilled labor is not becoming less valuable. That is precisely why more contractors are reconsidering how panel manufacturing fits into the larger business—not because the capabilities they have built are wrong, but because the realities around those capabilities continue to evolve.

Rethink Your Approach to Panels.

Interested in discussing how Kele can support an upcoming panel project?

Explore Kele Panel Shop solutions →

Pneumatic to direct digital controls (DDC): Upgrade paths for existing buildings

Many commercial buildings still rely on pneumatic HVAC controls installed decades ago. While these systems may still function, they often come with hidden costs such as higher energy usage, increased maintenance, and limited visibility into system performance.

Direct digital controls (DDC), a core component of modern building automation systems (BAS), offer a more efficient and scalable alternative. The real challenge today is not deciding whether to upgrade but determining the most practical path forward and selecting the right components to support that transition.


Pneumatic systems vs direct digital controls (DDC)

Pneumatic systems use compressed air to control HVAC equipment like dampers and valves. Over time, these systems require regular calibration and ongoing maintenance, and performance can degrade due to air leaks and component wear.

Direct digital controls (DDC) replace air-based control with electronic sensors and programmable controllers. These systems connect to a computer based building automation system, allowing operators to monitor performance, adjust remotely, and automate sequences based on real-time conditions.


Key differences between pneumatic controls and DDC systems

The shift from pneumatic controls to DDC systems is more than a technology change; it directly impacts how a building operates.

Category Pneumatic controls DDC systems
Control Air-pressure-based operation that can drift over time and require manual adjustment. Continuous electronic feedback and programmable control maintain tighter setpoints.
Energy Limited scheduling and optimization capabilities, often resulting in unnecessary energy use. Automated scheduling and optimization actively manage equipment operation, reducing energy consumption.
Maintenance Requires regular calibration, repair of air leaks, compressor maintenance, and hands-on adjustments. Fewer mechanical dependencies with built-in diagnostics, alerts, and remote troubleshooting.
Visibility Limited centralized insight into system performance and conditions. Real-time monitoring through BAS workstations for critical conditions and system performance.
Adjustment Often requires manual intervention on-site. Remote and automated adjustments based on real-time data.

Visibility is where DDC systems provide the greatest advantage. Devices like the Kele RPS-W room pressure switch, IAQRM indoor air quality monitors, and Kele CO2 sensors connect to computer-based workstations and enable real-time monitoring of critical conditions, allowing operators to quickly identify and resolve issues and optimize ventilation.


Why building owners are upgrading to DDC now

Even when pneumatic systems are still operational, they are becoming harder to justify. Rising energy costs are exposing inefficiencies, and fewer technicians specialize in maintaining pneumatic systems.

At the same time, occupant expectations have increased. Tenants expect consistent comfort and responsive systems, while building owners are under pressure to meet sustainability goals and track performance metrics.

DDC systems address these challenges by improving efficiency, reducing maintenance demands, and providing the data needed for modern building management.


Upgrade paths from pneumatic to DDC systems

Upgrading from pneumatic to DDC does not require a complete system replacement all at once. There are several practical paths that allow buildings to modernize incrementally.

Full replacement Phased conversion Hybrid approach
Replace pneumatic infrastructure entirely and install a fully digital control system. Start by upgrading central equipment and adding a BAS front end, then expand to AHUs and zone-level controls. Retain some pneumatic devices while adding DDC control using interface devices.
Best for:
Major renovations or buildings with failing systems.
Best for:
Most occupied existing buildings.
Best for:
Fast modernization with controlled costs.
Highest upfront investment, but delivers maximum modernization and performance. Investment is spread over multiple phases, with improvements delivered incrementally. Lower disruption and less immediate equipment replacement.

A hybrid approach allows buildings to retain some pneumatic devices while adding DDC control. This is where electronic-to-pneumatic (E/P) transducers play a critical role.

DDC CONTROLLER → E/P TRANSDUCER → PNEUMATIC OUTPUT → EXISTING ACTUATOR

Devices such as the UCP-722 E/P transducer and EP-8000 series transducers convert electrical signals into pneumatic output, allowing DDC systems to control existing pneumatic actuators without full replacement. This approach is often the fastest way to modernize while controlling costs.

Additional supporting components, such as airflow measurement devices like the Kele FXP-10 airflow probe, KMS2 Series airflow measuring station, and current sensing relays like Kele CS current switches, can further improve system performance and provide deeper insight into building operation.


Common challenges when upgrading to DDC

Upgrading to DDC comes with a few common challenges, but most can be addressed with the right strategy.


Upfront cost.
Energy savings and reduced maintenance costs can offset the investment over time. Starting with targeted upgrades, such as central plants, AHUs, and pumping systems, can reduce initial costs and allow a phased implementation while still delivering measurable improvements.
Operational disruption.
Phased upgrades allow improvements to be implemented gradually, minimizing downtime.
Existing infrastructure.
Older buildings may present infrastructure challenges, but modern DDC components are designed for flexibility and can often be installed without major construction.

Choosing the right DDC upgrade strategy

The best upgrade path depends on the condition of the existing system, available budget, and long-term goals.

Full replacements are typically best suited for major renovations or buildings with failing infrastructure. For most facilities, phased or hybrid approaches offer a more balanced solution.

Starting with high-impact upgrades—such as improving sensing and adding DDC controllers, or integrating pneumatic equipment with DDC—can deliver immediate ROI while building toward a full transition.

Kele offers a broad range of building automation components—including sensors, controllers, relays, and interface devices—designed to support every stage of a pneumatic-to-DDC upgrade.

A practical place to startPrioritize systems where better sensing and control can deliver measurable operational improvements, such as central plants, AHUs, critical measurement points, and high-maintenance equipment.


Conclusion

Pneumatic systems are no longer aligned with the demands of modern building operations. Direct digital controls (DDC) provide the precision, efficiency, and visibility needed to reduce costs and improve performance.

The most effective upgrade strategies focus on incremental improvements, using the right mix of sensors, controllers, and integration devices to transition from pneumatic to DDC over time.

Whether starting with a single system or planning a full conversion, selecting the right components is critical. With the right approach and the right products, buildings can modernize without unnecessary cost or disruption.